fabric: pretty paper. true stories. {and scrapbooking classes with cupcakes.}

lovely to meet you Twitter Facebook Pinterest YouTube

Take a Scrapbooking Class

online scrapbooking classes

Shop Shimelle Products

scrapbook.com simon says stamp shimelle scrapbooking products @ amazon.com shimelle scrapbooking products @ amazon.co.uk

Reading Material

travel

Much better luck.

Thank goodness Friday’s project went so much better than that lovely post o’ yesterday.

This skirt was totally cheating, but I fell in love with the fabric (which looks not dissimilar to my knitting chair!) and decided it would have to be made to work.

Instead of starting from scratch, this is just a reconstruction. What’s a skirt now was a little girl’s dress. As it had an empire waist and a full skirt, there was plenty of fabric from an age ten dress to make a grown-up sized skirt. It was just a case of chopping off the top of the dress (which I will not be surprised to see later this week as an alice band and something flowery, inspired by these, perhaps), hemming the waist and adding a zipper. It even has a little sash that ties in the back.

There’s tons out there on reconstruction, which can be way more involved than cutting the top off a dress, if you want. Try Craftster, Get Crafty or T-Shirt Surgery for a start, though google will bring you much if you want to look for something specific, like t-shirts or skirts.

Oh, hello weekend! I’ve missed you so.

xlovesx

From the heart

Oh goodness—what a week. Exciting things but I can’t tell yet. Hate that! But after the insanity of it all, some sewing. Oh, the therapy.

Even better, sewing for a cause. Melanie from Fiskars has set us up for some cool goodies. She’s got some of these fab tools to send to a lucky winner.

To win, click on this, this and this, then leave me a comment about your most favourite heart-shaped thing in the world. One lucky commenter will receive the goodies from Melanie!

Or here’s another way to help. This week, I’ll be selling a few pillows on Etsy, and all the proceeds will be donated to AHA and the BHF (half to each). The first one is this pink and green log cabin, and it can be yours here.

Happy Sunday, with extra heart shapes thrown in!

xlovesx

More from Alice

So some of the girls at school have decided to pick up the needles, and I promised them I would post something that would work as a first project without taking them three years to finish. It’s as simple as a scarf, but way smaller: an alice band. For them and anyone else who might want a few basic how-to-knit links, try the UK handknitters, the US handknitters or Lion Brand just google, as there are plenty out there.

For this little project, pick your yarn and pick up a set of needles in the size recommended on the yarn label. All you need to know is how to cast on, knit and cast off (though you can clearly make all sorts of pretty patterns if you want to do fancy stitches, just like scarves).

Cast on the number of stitches it takes to get the width you want, then knit every row, taking time to measure it around your head, making silly faces and suggesting you just wear it with the needles attached as to avoid ever having to cast off.

When it’s long enough to go around your head and tie, cast off. Weave in your ends.

Tie it around your head or go all fancy and sew it together or add buttons, etc. Like a scarf, but teeny-tiny and keeps your hair in place. All important things, right?

Now I wonder how many of these I will see in Monday’s lessons!

xlovesx

Source Point


(Originally uploaded by Natalie Zee)

So we’re back to Tuesday…and I’m working on something inspired by this, found on Flickr and from a Japanese crafting book. Something felt and handy for taking the basics on the go! Right now my camera battery is a-charging! So I can show it to you tomorrow. :)

AND I’ve got a winner for our felt! The boy picked a number and it came up to this comment:

Dawn Says:
2 May 2007, 15:44
I made one and it didn’t take long! I used fleece as I’m on a stash embargo no buying anything for me (except the blue flowers I needed for a LO)I will also use it on a LO/LOs to, may be a CJ I have to do.

He picks ‘em well—stash embargo doesn’t mean you can’t receive free goodies, right? So Dawn! Send me your postal address! :) I have lots of goodies to post out this week! :)

What are you making today?

xlovesx

Sewing on a Sunday Evening

After sleeping in on a grey Sunday morning, I am feeling much better. Sleep almost seems to be a theme of the week more than craftiness, but if that’s the cure, that’s fine. I managed to find some time tonight to make this as my little project for the day. My sewing machine was very happy to not be neglected as she has been for far too long! Think I’ll have to take a nicer picture in the daylight tomorrow, perhaps.

Must go back to that other theme and catch some zzzzs. Hope your weekend has been lovely.

xlovesx

Hearts and Java

I drink way too much take-away coffee. And I can’t be the only one. And since it’s knitting Friday, I thought I’d play with something that could declare my coffee love while also keep a bit more cardboard out of a landfill.

Before you say it, yes, I have several refillable coffee cups. Well, two. So definitely in the plural. I try. But I fail. I don’t have a regularly scheduled coffee stop, so I don’t have my cup with me. Yes, I really, really need to fix this and stop all the madness of paper cups. But I guess this is a baby step.

Here’s a super cool pattern on double-pointed needles, but I decided to try a little something different and I needed to see it flat to see if it was working, so my pattern doesn’t look much like that one now.

My eyes have gotten too tired looking at the last two rows, so I’ll have to finish it in the morning, but I’ve done nearly all of it, so it’s still knitting Friday, right? :) ETA: finished!

I Heart Coffee Cup Cozy
Needles: 3.5mm
Yarn: 2 colours of baby weight—I used Jaeger Matchmaker 4ply and Debbie Bliss baby cashmerino, but there’s tons that would work easily. And you need significantly less than 1 ball of each. Like mere inches of the contrast colour, even.

With main colour, cast on 72 stitches.
The first four rows are 4×4 rib, so knit 4, purl 4 and repeat until the end of the row, for four rows.
Row 5: knit.
Row 6: purl.
Row 7: knit 18, join contrast colour and knit 1, return to main colour and knit to end.
Row 8: purl in main colour until one stitch before the contrast colour on the row before. This time you want three stitches in contrast, then return to main colour and purl to the end.
Row 9: knit in main colour until one stitch before the contrast. This time you want five stitches in contrast, then return to main colour and knit to end.
Row 10: purl in main colour until one stitch before the contrast. This row has seven stitches in contrast, then return to main colour and purl to end.
Row 11: knit in main colour until the contrast (not one before). Knit three stitches in contrast, one in main, three in contrast. Return to main colour and knit to the end.
Row 12: purl in main colour until the contrast. Purl two stitches in contrast, three in main, two in contrast. Return to main colour and purl to the end.
Row 13: knit in main colour until the contrast. Knit two stitches in contrast, three in main, two in contrast. Return to main colour and knit to the end.
Row 14: purl, all in main colour.
Row 15: knit.
Row 16 starts the 4×4 rib again, just like at the beginning. Repeat up to row 20, and cast off in the 4×4 pattern.

For the finishing, you’ll need a cup to wrap it around, plus a needle and thread or yarn. Wrap it around the cup and pin the top and bottom for a good fit, then stitch that edge. I have overlap in mine, so I don’t burn my hands! Stitch it up, and baste the loose edge in place and you’re done…though it could look extra cute with buttons and things, you know.

Don’t forget to comment on the felt post to be entered in the drawing for the giveaway. :)

xlovesx

Follow your wishing heart

If you ever want to alienate a teenager, get rid of your television.

The kids are continually amazed that I can exist without a TV (so are the folks at TV licensing, but that’s a different matter) and about once a week, a student will come up to me and ask ‘Is it true?’ When I confirm their worst fears, they immediately want to know what on earth I could do when I should be watching TV.

I suppose this is sorta it.

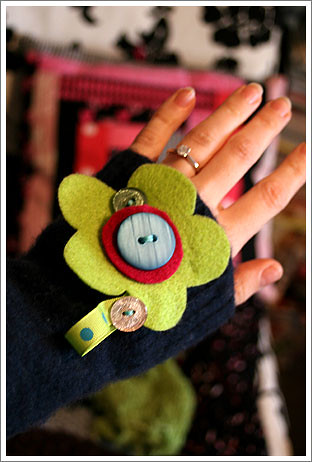
I tell them I have plenty of other things to do. So here is the first one: sewing little things from felt to wear. Because it’s Tuesday. You can totally do this.

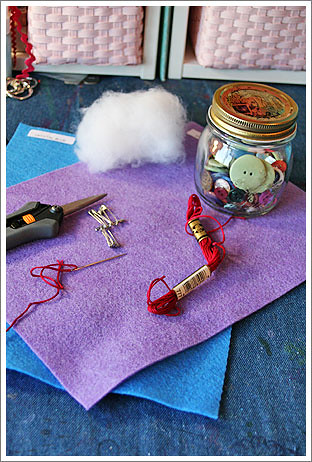
You’ll need some felt, some thread, a needle, scissors, a safety pin, some sort of stuffing and a few buttons.

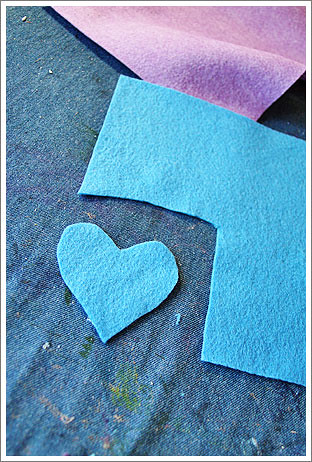
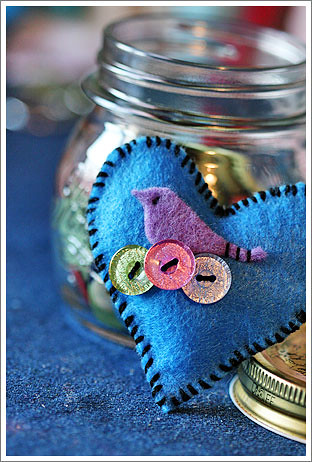
Since May is all about sharing the heart-shaped love, we’re going with a heart shape straight away. Using a template or freehanding it, cut a heart from felt in a size appropriate to what you want to make. Little for a hair pin, medium for a label pin and giant for a pillow. Once you get one heart just as you like it, use it to cut a second just the same.

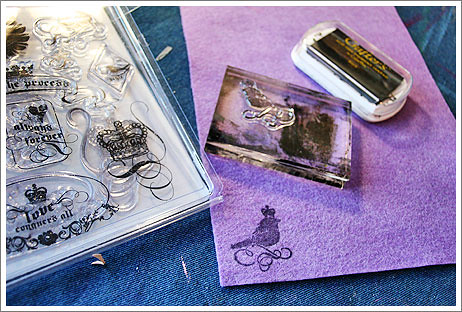
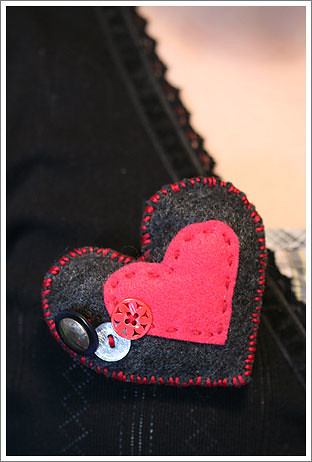
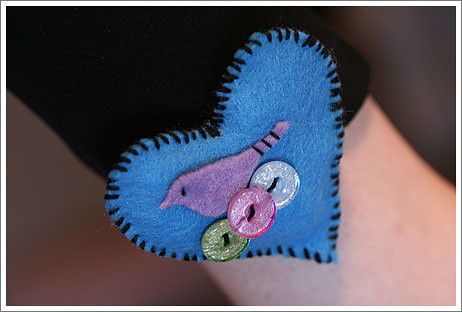
Choose one of those hearts and add whatever decoration you would like. You might cut another smaller heart and stitch it on, then add some buttons. You might stitch your name or a word straight across the felt. Or you might wish you could freehand cut a bird, realise you have a bird the right size on a stamp, stamp that bird onto felt, cut it out and turn it over, then stitch it town and add some sparkly buttons for it to sit on. Or you might do something else.

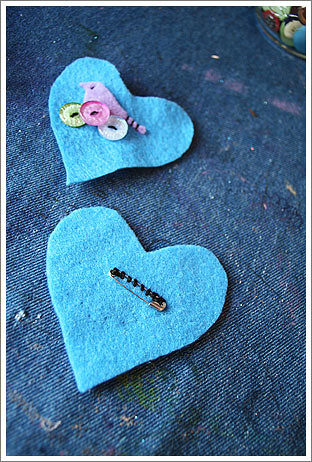
Sew a safety pin to the back of the other heart (make sure you get the right side to make the two hearts line up). Or sew whatever else you want to attach here, like a hair clip or a shoelace. Don’t be tempted to sew the safety pin before your design—that will be the time you totally goof and want the other heart for a do-over. So safety-pin second just in case.

Then for the sewing…you’ll need plenty of thread (it takes more than you may guess) and a needle. Read Heather’s tutorial for the best knot ever. It really is.
Hold the two hearts together, just as they should be when they are finished. With that knot in your thread, go to the dip in the middle of the heart. Start with the needle in between the two layers, going up through the top one. Take the needle down to the bottom heart and push back up to the top so that first stitch is secure. Then just keep stitching around, pushing the needle up from the bottom to the top and back again. Stop when you get nearly all the way around, but not quite. You need to have room to add the stuffing. Push the stuffing in (these are little so you can use cotton balls or scrap yarn or whatever else is fluffy if you don’t have traditional stuffing handy) and move it around until you’re happy with it—it’s harder to even it out once it’s sewn in. Then finish your stitches around to where you started, and make sure the last few stitches are nice and secure with a knot. (Don’t worry too much—the back won’t show so if it gets a bit scary, just stitch through to the back and knot it there and no one but you will ever know.)

Pin to something and smile everytime someone asks you where you got such an adorable thing.

Now here’s the fun part: if you make something inspired by this, I hope you’ll share it with everyone! Here’s a badge you can display if you post it on your blog or something like that:

That way, you can share the love by linking back to the instructions if someone wants to know how you made it. :) Plus if you heart flickr, you can post your pictures in the Share the {Crafty} Love Flickr Group By the end of May, it should be filled with images, since there’s a project pretty much every day in May! {I’m just gonna keep saying that because it’s fun.}

And one more thing: I’ve got a lovely little sampler of felt to give to one lucky person who comments on this post. Entries will close one week from today, so 9am London time on Tuesday 8th May. (Just to clarify: you don’t have to be in the UK to win. Anywhere is cool!)

xlovesx

ETA: turning comments off as this one seems to be spam target o’ the day on the internets.

Starting something new

Happy New Year from the knitting chair!

A busy place it has been, actually. A few days of no stress are good for getting things off the needles.

A scarf for the boy, a sparkly scarf for me and the cardigan I started last winter. I am rather excited about finishing that. I never thought I would, really. So yay!

And just to make you smile, I have also been making these.

I promise to be back with a post of more substance tomorrow.

Happy New Year!

xlovesx